
In normal e-commerce websites, customers do not like to register before placing orders. Customers like to do easy checkout by selecting their product so they prefer to do direct guest checkout. Magento supports Guest checkout but when a customer wants to order the same product that time he/she is not able to order the same product.
Our Guest to Customer blog for Magento2 quickly and seamlessly converts any guest order and transfers all order and customer information over as a registered customer and notifies the user on how to access their newly created customer account.
A customer can login to an account and check their previous order on the dashboard.
Steps to Convert Guest To Customer:
Create the folder of GuestCustomer module
The name of the module is defined as “VendorName_ModuleName”.
app/code/Akansha/GuestCustomer
Create app/code/Akansha/GuestCustomer/etc/module.xml file
create etc folder and add the module.xml file
Contents would be:
<?xml version="1.0" ?>

    <config xmlns:xsi="http://www.w3.org/2001/XMLSchema-instance" xsi:noNamespaceSchemaLocation="urn:magento:framework:Module/etc/module.xsd">

    <module name="Akansha_GuestCustomer" setup_version="1.0.0"/>

</config>
Create app/code/Akansha/GuestCustomer/registration.php fileConvert Guest To
create registration.php file
Contents would be:
<?php

\Magento\Framework\Component\ComponentRegistrar::register(

    \Magento\Framework\Component\ComponentRegistrar::MODULE,

    "Akansha_GuestCustomer",

    __DIR__

);
Create app/code/Akansha/GuestCustomer/etc/frontend/events.xml file
Contents would be:
<?xml version="1.0"?>

<config xmlns:xsi="http://www.w3.org/2001/XMLSchema-instance" xsi:noNamespaceSchemaLocation="urn:magento:framework:Event/etc/events.xsd">

    <event name="checkout_onepage_controller_success_action">

        <observer name="guestregistration" instance="Akansha\GuestCustomer\Observer\ConvertGuest" />

</event>

</config>
Create app/code/Akansha/GuestCustomer/Observer/ConvertGuest.php file
Contents would be:
<?php

namespace Akansha\GuestCustomer\Observer;

class ConvertGuest implements \Magento\Framework\Event\ObserverInterface

{

    public function __construct(

        \Magento\Store\Model\StoreManagerInterface $storeManager,

        \Magento\Sales\Api\OrderCustomerManagementInterface $orderCustomerService,

        \Magento\Sales\Model\OrderFactory $orderFactory,

        \Magento\Sales\Api\OrderRepositoryInterface $orderRepository,

        \Magento\Customer\Model\CustomerFactory $customer

    ) {

        $this->_storeManager = $storeManager;

        $this->orderCustomerService = $orderCustomerService;

        $this->_orderFactory = $orderFactory;

        $this->orderRepository = $orderRepository;

        $this->_customer = $customer;

    }


    public function execute(\Magento\Framework\Event\Observer $observer)

    {

        $orderIds = $observer->getEvent()->getOrderIds();


        $orderId = $orderIds[0];

        $order = $this->_orderFactory->create()->load($orderId);

        $customer= $this->_customer->create();

        $customer->setWebsiteId($this->_storeManager->getStore()->getWebsiteId());

        $customer->loadByEmail($order->getCustomerEmail());

        //Convert guest into customer

        if ($order->getId() && !$customer->getId()) {

            $this->orderCustomerService->create($orderId);

        } else {

            //if customer Registered and checkout as guest

            $order->setCustomerId($customer->getId());

            $order->setCustomerIsGuest(0);

            $this->orderRepository->save($order);

        }

    }

}
After creating the module if you run the command as:
PHP bin/Magento setup:upgrade
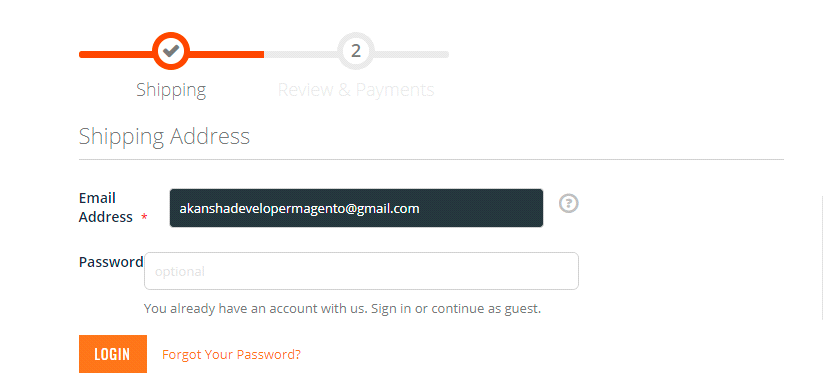
Firstly, Placed an Order as a guest checkout on the Magento website. Complete the Shipping and payment step then placed the order using any email id.
After the order is placed, checked your email. There is a welcome email from the Website.
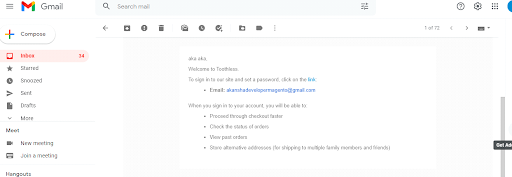
You will get a link on the e-mail, on clicking that link you can set your password.
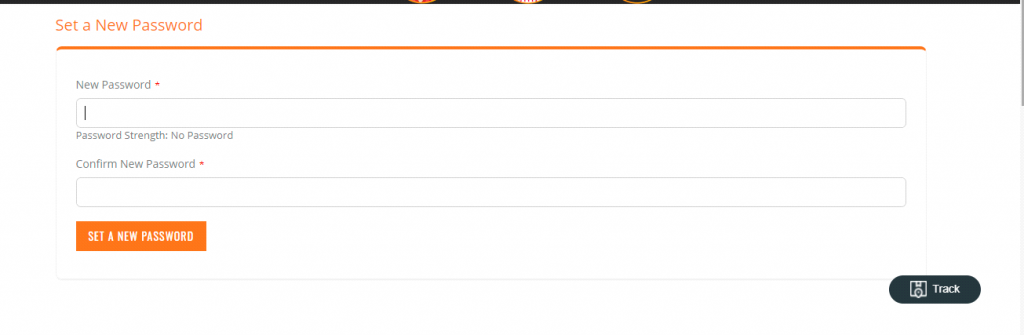
After setting that password, you will login using that email id or password. After loin, when you see your dashboard, you will see your previous order.
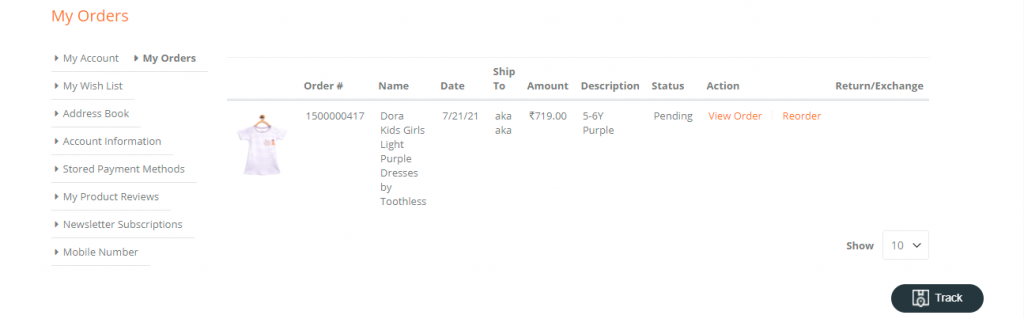
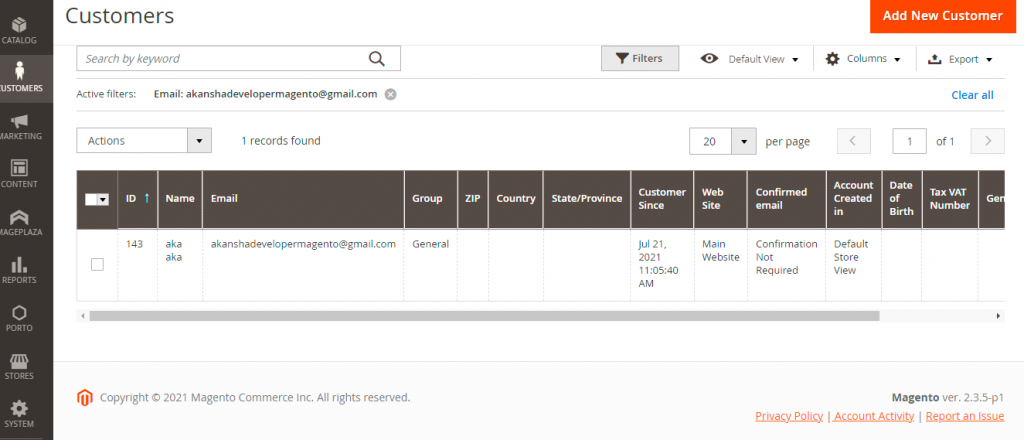
That customer will start showing in the customer grid in the admin panel.
Conclusion
Our Blog solves this problem related to reordering or modifying existing orders without having to manually copy all of your customer’s existing billing and shipping information.